
There are several reasons why real-time weather information can be considered highly valuable and important. By learning how to create a weather app with HTML, CSS, and JavaScript, you can gain the ability to always obtain the most up-to-date weather information. Your app can retrieve the exact weather conditions and forecasts for any area in the world by using a weather API such as the reputable one from weatherstack. Weather APIs are essential for this procedure since they provide detailed, up-to-date data that benefits the user and guarantees the continued operation of your service. We’ll walk you through the processes needed to create a weather app in this guide. We will additionally guide you through the simple process of incorporating weatherstack’s API into your project.
Table of Contents
What is a Weather API?
A Weather API is a web service that provides weather data to developers and businesses. These APIs provide their users with data from official weather sources. Moreover, weather APIs usually provide data to their users with API keys.
By using a weather API, you can create a weather app that offers different types of weather information. This is required for building a user-friendly weather app that meets app users’ needs. The best weather apps, like those found in the Apple App Store and Google Play, use weather APIs for accurate weather forecasting and smart notifications. Popular weather APIs, such as weatherstack, OpenWeatherMap, and Weather Underground, provide much-needed weather information, including wind speed, satellite maps, and air quality, to improve weather visualizations. Using a weather API key, developers can integrate weather conditions into their mobile apps or web applications. By doing so they can create a fully functional weather app that stands out in the competitive weather app market.
Some Popular Weather APIs
Today there are many weather APIs that provide weather data. Among these APIs, some of the best weather APIs to use in a simple weather app are listed below.
- The weatherstack API
- AccuWeather API
- OpenWeatherMap API
- Open-Meteo API
- Visual Crossing Weather API
- Weather API
- Storm Glass API
- World Weather Online API
How to Pick a Good Weather API?
You have to choose the right weather API when creating a weather app. A good weather API should provide current weather data, precise weather forecasts, and historical data to make sure that your weather app is accurate and reliable. Also, for a user-friendly weather app, consider the API’s ease of use, available documentation, and the simplicity of API calls. Popular options like weatherstack, OpenWeatherMap, and Weather Underground are well-regarded in the weather app market. They offer weather data, including wind speed, air quality, and satellite maps, which are required for building a complete weather app. According to market research, users place a high value on smartphone apps that offer push notifications, weather visualizations, and hyper-local forecasts. To maximize the availability of the application throughout app stores, make sure the API you select supports several platforms, such as the web and mobile operating systems like iOS, and Android.
How to Create a Weather App With the Weatherstack API?
In this section, we will develop a weather web application whose weatherstack API provides us with the current weather data in the location we want. We will use HTML, CSS, JavaScript, and Bootstrap while developing this application. Then we will use a single HTML file for this weather app development.
We need an API key in order to retrieve the most recent weather information from the weatherstack API. Let’s subscribe to one of the more reasonably priced plans provided by the weatherstack API in order to obtain this API key.
After registration, we can get the API key and can start developing our application. To build the application, let’s open a file called “current-weather-app-with-the-weatherstack.html” in the file directory. We will insert the following code into this file.
<!DOCTYPE html>
<html lang="en">
<head>
  <meta charset="UTF-8">
  <meta name="viewport" content="width=device-width, initial-scale=1.0">
  <title>Weather App</title>
  <link rel="stylesheet" href="https://stackpath.bootstrapcdn.com/bootstrap/4.5.2/css/bootstrap.min.css">
  <style>
    body {
      padding: 20px;
    }
    .weather-card {
      max-width: 400px;
      margin: 0 auto;
      background-color: #f7f7f7;
      padding: 20px;
      border-radius: 5px;
      box-shadow: 0 2px 4px rgba(0, 0, 0, 0.1);
    }
    .weather-icon {
      max-width: 100px;
      margin: 0 auto;
      display: block;
    }
  </style>
</head>
<body>
  <div class="container">
    <div class="weather-card">
      <h1 class="text-center">Current Weather</h1>
      <form id="location-form">
        <div class="form-group">
          <label for="location-input">Location:</label>
          <input type="text" class="form-control" id="location-input" placeholder="Ex: New York">
        </div>
        <button type="submit" class="btn btn-primary">Search</button>
      </form>
      <div id="weather-info" class="mt-4"></div>
    </div>
  </div>

  <script>
    const form = document.getElementById('location-form');
    const input = document.getElementById('location-input');
    const weatherInfo = document.getElementById('weather-info');

    form.addEventListener('submit', (e) => {
      e.preventDefault();
      const location = input.value.trim();

      // variable called API Key
      const APIKey = 'YOUR-API-KEY';
      fetch(`https://api.weatherstack.com/current?access_key=${APIKey}&query=${encodeURIComponent(location)}`)
        .then(response => response.json())
        .then(data => {
          renderWeatherData(data);
        })
        .catch(error => {
          console.log(error);
          weatherInfo.innerHTML = '<p class="text-danger">Please try again!</p>';
        });

      input.value = '';
    });

    function renderWeatherData(data) {
      const location = data.location;
      const currentWeather = data.current;

      const html = `
        <h2 class="text-center">${location.name}, ${location.country}</h2>
        <div class="text-center">
          <img src="${currentWeather.weather_icons[0]}" alt="${currentWeather.weather_descriptions[0]}" class="weather-icon">
          <p>${currentWeather.weather_descriptions[0]}</p>
          <p>Temperature: ${currentWeather.temperature}°C</p>
          <p>Feels Like: ${currentWeather.feelslike}°C</p>
          <p>Wind Speed: ${currentWeather.wind_speed} km/s</p>
          <p>Humidity: ${currentWeather.humidity}%</p>
          <p>UV Index: ${currentWeather.uv_index}</p>
          <p>Observation Time: ${currentWeather.observation_time}</p>
        </div>
      `;
      weatherInfo.innerHTML = html;
    }
  </script>
</body>
</html>
This above code can be used to obtain the current weather information of the location that the user enters from the weatherstack API via the fetch API and print it on the screen. Before running the application you should write your own API key to the ‘APIKey’ variable and run the application.
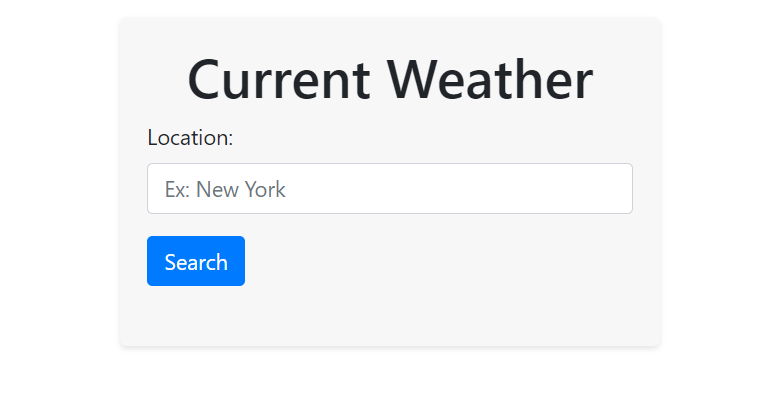
After running the application, the following page will welcome you.
After typing ‘Berlin’ in the location field on this weather page and pressing the ‘Search’ button, the current weather data presented to us by the application will be as follows.

Why Pick Weatherstack?

Weatherstack is an excellent choice for app developers who want to create a weather app. This reliable weather API provider offers real-time weather data, making it easy to build a user-friendly weather app with an accurate weather forecast. You can spend minimal time developing an app using weatherstack as it makes the process that much easier. This is because it provides accurate weather reports, weather conditions, and hyper-local forecasts. App users can benefit from current weather data, satellite maps, and smart notifications.
These features ensure your app remains functional and up-to-date. Weatherstack supports various platforms, including mobile apps for Android and iOS. This compatibility can increase your app’s visibility on Google Play and the Apple App Store. Its reliable API allows for easy integration with HTML, CSS, and JavaScript allowing you to build a weather app from scratch. Choose weatherstack for detailed weather information and to create a fully functional weather app.
Conclusion
Using the weatherstack API along with HTML, CSS, and JavaScript to create a weather app allows for a simple approach to give app users access to current weather information and accurate weather forecasts. By following this guide, you can build your own weather app that stands out in this market space. Also, you can use weatherstack to build apps for a variety of platforms, including web apps and mobile ones for operating systems like iOS and Android. Additionally, with features such as push notifications, weather visualizations, and satellite maps, you can create a user-friendly weather app that will appeal to a broad audience. Start building a simple weather app today and join the best weather apps in delivering accurate and up-to-date weather information to your users. Therefore go to weatherstack’s website and get your very own subscription today!
FAQs
Is there a totally free weather app?
Yes, there are several totally free weather apps, such as WeatherBug and The Weather Channel app.
Does Google have a weather app?
Although it doesn’t have a separate weather app, Google offers weather data via its Google app and Google Assistant.
What is the best free weather app?
The Weather Channel is the most popular weather app available right now.
How to use Weatherstack API?
Obtain an API key by registering on the Weatherstack website. Then, you can use the key to send HTTP requests to the Weatherstack API endpoints in order to retrieve weather information for the places you want to monitor.